CREATING AND EDITING A VFR FLIGHT ROUTE
A route for a VFR flight can be created entirely using the interactive features of the map window in Step 1.
- Click the draw icon on the map toolbar to switch to the VFR edit mode (the icon will turn blue).

- Click the location where you want to start your flight, and click SET DEPARTURE in the pop-up dialog.
- Click the location where you want to end your flight, and click SET DESTINATION in the pop-up dialog.
The route is drawn on the map as an arc between these two points. - Point the mouse at the mid-point of the route (shown by a small grey circle).
The mouse pointer arrow changes to a hand icon. - Click and drag the point on the route to the new position, and release the mouse button.
The route will move, snapping to the closest PBD (place-bearing-distance) point within the radius selected in your account settings.
A small white circle on top of a triangle indicates that a new waypoint has been created for the route:
- Click the waypoint to display a dialog which allows you to view and edit the waypoint in several ways:
- Click SET DEPARTURE to make that waypoint the departure location of the flight.
- Click REMOVE WAYPOINT to remove the waypoint from the route.
- Click SET DESTINATION to make that waypoint the destination of the flight.
- Click ADD STAY to set a stay at the waypoint (used in fuel calculations). Enter the duration of the stay (in minutes) and information on the reason for the stay, and click OK.
- Click X to close the dialog without changing the route. - Click anywhere on the map and a similar dialog appears allowing you to set departure/destination, add a waypoint or add a stay at that location.
Note: The stay or waypoint will be added to the last leg of the current route. Take care when changing departure or destination locations as this cannot be undone without erasing the entire route.
Tip: At any time, you can change the departure or destination using the settings in the panel on the left side of the screen, and the route will be adjusted accordingly. - Point the mouse at a waypoint and information about it will appear on the map (location and identifier).
- Once the route is finished, click the draw icon on the map toolbar to disable the edit mode and lock the details in the software.
The waypoints are now shown as triangles. The shortened route string is displayed in the pane on the left of the screen.
With the VFR edit mode disabled, you can use the map to view further information on the route:
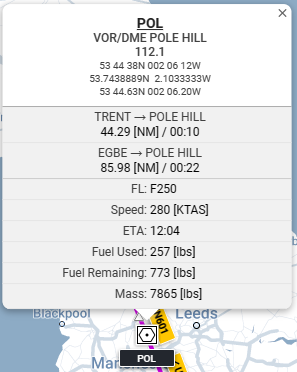
- Click the waypoints along the route to display details of their location in a dialog, with calculated fuel and aircraft mass values for that location, and distances and enroute times for the preceding and subsequent legs of the flight.
Where the waypoint identifier is underlined, click the identifier to view an aerial image of the view at that location for reference in flight.
Click X to close the dialog.

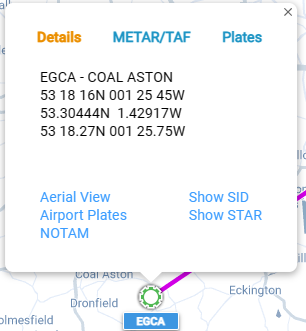
- Click a recognised aerodrome (shown on the map by the symbol
 ) to access aerial views, weather and NOTAM information for the airport, and to display SID and STAR routes on the map where available.

Note: You can click the ![]() button on the left of the map to view the map in full screen mode. Note that the toolbar is not shown in this view. Click
button on the left of the map to view the map in full screen mode. Note that the toolbar is not shown in this view. Click ![]() again or press the Esc key on the keyboard to return to the normal view.
again or press the Esc key on the keyboard to return to the normal view.
The Map Toolbar provides many other useful tools to help with route planning.
Return to Flight Planning with the Web App