 USING THE MAP WHEN FLYING (iOS)
In addition to its use in creating and editing flight plans, the Map screen in the iOS app is likely to be the screen you use the most before and during a flight, as it allows you to view essential information and track your position with respect to the flight plan route.
Viewing General Flight Information
There is a series of settings you can apply to the Map screen to view various types of flight information. In each case, tap the icon shown to view the options available.
|
Icon |
Function |
Details |
|
|
Settings |
Tap to expand the list of all settings options, showing which ones are active (blue) or switched off (grey). |
|
|
Waypoints |
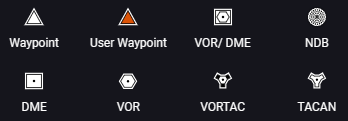
Tap to view user waypoints, visual reference points (VRP) or all waypoints. The symbols used (see below) are the same as used in the web app:
|
|
|
Airfields |
Tap to view airfields for IFR or VFR flights, helicopter pads or all airfields. Then tap a location to view current weather data and links to other detailed information in a sidebar. Click Show Plates to download (if necessary) and display the plates in a panel for viewing on the screen. |
|
|
Airways |
Tap to view high or low level airways with their identifiers. |
|
|
Obstacles |
Tap to view obstacle markers with their height above ground level. |
|
|
Weather |
Tap to view recent weather radar and/or lightning data on the map. Drag the slider at the bottom of the screen to view the information at different times. |
|
|
Hide All |
Tap to turn off all the information settings listed above from the map. |
|
|
Flight Assistance |
Tap to add various information tools for your flight to the map (see below). |
|
|
Map Library |
Tap to display a library of maps you can download and activate to add to the screen (see below). |
|
|
Map Overlays |
Tap to add overlays to the map, including details of NOTAMs and where they apply (see below). |
|
|
Tap Scratchpad to open a notepad layer on the Map screen where you can add notes or sketches (save these by tapping Done). Also select this option to view previous notes saved to this layer from other screens. Tap Draw on Map to annotate directly on the map, and then tap Done to save the notations. Tap + to add more layers of notations and then scroll through them using the numbers at the top of the screen. Hide all the notations by turning off the On Map Notations overlay (tap In both drawing modes, tap |
Viewing Weather Information for a Location
In addition to the weather overlay that you can apply using the map settings (see the table above), you can quickly view weather information for a specific location in two ways:
- When planning a flight in the Quick File screen, tap the coloured box to the right of the departure and arrival locations in the top panel.
A pop-up box will show details for the airfield including METAR information.
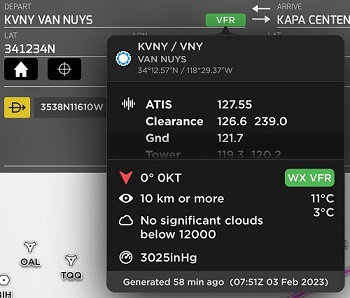
- When viewing a route in the map screen, tap any location and a sidebar will show METAR information for that location (for airfields) or for three nearby locations (for waypoints).
If there is no information available for an airfield, then the forecast at a nearby airfield is shown instead.
Refer to this online article for further details.
Map Library
The Map Library gives an easy way to manage the mapping information stored and displayed in your app. To add information to your map screen:
- Tap
 and then
  in the map screen to display the Map Library.
 - Select an option from the list and tap ....
You can search the list using the Search box near the top of the library sidebar.
If you can't see the map option you want, tap and purchase the required map under the Charts tab in the Shop screen.
- Look at the Details of the map if preferred, and then tap Download to save it to your device.
Charts currently downloading are shown at the top of the list in the Map Library with the progress displayed. - Once a map is downloaded to your device, you can choose to Activate it immediately or wait until Later.
Activating a map displays it on the map screen. You can activate a downloaded map at any time by tapping the map in the Map Library list.
Activated charts are listed first (alphabetically by country) in the Map Library list, followed by charts that are downloaded but deactivated, and finally charts that are not yet downloaded.
Note that the Countries and Cities chart is always available in the app.
You can also use the Map Library to manage the maps on your device:
- To deactivate an activated map, tap the map in the Map Library list.
This will remove it from the map screen, but not delete it from your device. You can reactivate it at any time in the same way. - To update a downloaded map, tap ... and then select Reload.
- To delete a map completely, tap ..., select Delete, and confirm you want to delete the map.
To delete all the maps on your device:
- Tap
 to display the maps you have downloaded to your device.
 - Tap
 to select all maps, then tap
  and confirm you want to delete the maps.
Viewing Your Flight Route
Depending on the last time you used the Map screen, there may or may not be a route already displayed.
- To select a new route, tap
 in the top right of the screen and select a flight from the list displayed (these can be active, draft, or historic flights saved on your app).
 - Tap
 repeatedly to centre the screen on the entire route, the departure point and the destination in turn.
 - Tap Flight Log or
on the tab near the bottom of the screen to view a simple flight log for the route.
This lists the target waypoint for each stage of the route, with the fuel consumption, bearing, distance, and estimated flight and arrival times. The current stage of the route being flown is highlighted.
Tap the tab again to hide the flight log.
If you tap for a stage of the flight in the flight log, then the app will display the bearing, distance, and estimated fuel and time required to reach that location directly from your present position (if GPS tracking is operating). Tap
  to return to the original flight route display.
Note: When your device is offline, wind and weather data cannot be applied to optimise the accuracy of the flight log calculations. - Tap Vertical Profile or
on the tab near the bottom of the screen to view a vertical profile of your route. You can zoom and pan using the normal finger movements on the screen.
Note: Your device must be connected to wi-fi to create a vertical profile, although you can continue to view it once your device is offline. If the accuracy of your current position is too low, or if you are off-track by more than 5 NM, your aircraft icon will not be shown on the vertical profile for safety.
To increase the information shown on the profile, you can download the terrain data and recorded obstacles for the area being flown if available (also see the Settings menu). You can also include regions of airspace if this overlay option is enabled on your account. When you select an airspace on the map, it is highlighted in the vertical profile.
Adding Overlays
You can add various overlays to the map depending on the features enabled on your account. These always include the details of NOTAMs currently applying on or near to your route, and any user-defined areas configured in the web app. The information on NOTAMs is updated automatically every 30 minutes when your device is connected to Wi-fi.
- Tap
 and then
  in the map screen.
 - In the pop-up box, slide the slider to the right to activate the required overlay.
- Use the sliders to suppress (hide) specific types of NOTAM if preferred to prevent the map becoming too crowded.
If you choose to suppress any NOTAMs, a red dot is shown next to the settings button as a reminder. - Tap X to close the pop-up box.
User-defined areas are shown with a coloured border. The area over which each NOTAM applies is displayed as a circle (unless coordinates are provided in the NOTAM, in which case it will be represented by an appropriate polygon). In the centre is a circular marker labelled with an exclamation mark; tap this to view details about all the NOTAMs in that area.
The colours of the NOTAM circles and the borders of user defined areas can be adjusted in the app's Settings menu.
- To remove an overlay, tap
 and
and  (which will be coloured blue if an overlay is selected), and slide the appropriate slider to the left.
Other overlays that may be available (if enabled on your account) include:
VFR procedures: displays the VFR vector tracks for an airfield, to assist you in following the correct procedures when using that airfield.
On map notations: displays the combined layers of annotations drawn on the map.
Show recent airports: displays the most recently used airports with a dark border so you can easily find and use them again.
Airspace: use the slider to choose the maximum flight level for which the airspace class or type is displayed.
Communication Areas: displays the edges of geometric areas where specific radio frequencies are available for communications. Tap a point on the map and then tap Airspace Info in the sidebar to view a list of the communication areas available at that location. Tap an item in the list to view more information and see the area's geometry on the map.
Tracking Your Position
The mobile device you are using to run the iOS FlightPlan app can be tracked during a flight and associated with one of the aircraft on your account. You can then compare your flown route with the filed flight plan.
- Tap
 in the top right of the screen and select the aircraft you are going to fly.
 - Tap
 in the bottom left of the screen to centre the map on your current location with north at the top of the screen (the button will turn blue).
Tap this button again to set the direction of travel towards the top of the screen (shown by the symbol ). You can disable the centred view by dragging the map in any direction.
Based on the tracking settings in the app, a recording of your flight will start when the aircraft exceeds the set speed and continue until the speed falls below this value once again. When complete, the recording is saved as a VFR flight in the Historic flight tab for you to review. It is not filed or sent to any of the AFTN addresses normally notified of flight plans. - To view the planned route of a flight, tap
 in the top right of the screen and select a flight from the list displayed.
The route is displayed on the same map as your current position. - To disable tracking at any time, tap
 again (it will be coloured blue) and confirm by tapping Disable.
Note: The current accuracy of the GPS tracking for your device is displayed next to the ![]() button. This value is shown in red if it exceeds the safety limit set in the app's Settings menu, and tracking is not possible (the aircraft icon is not displayed and the
button. This value is shown in red if it exceeds the safety limit set in the app's Settings menu, and tracking is not possible (the aircraft icon is not displayed and the ![]() button is disabled).
button is disabled).
Flight Assistance
These settings allow you to view helpful information to help you quickly make informed decisions as needed during the flight.
- Tap
 and then
  in the map screen.
 - Use the sliders to activate or deactivate the required features.
- Route Line Opacity allows you to adjust the display of the route lines on the map, to either make them stand out against the background or allow other map information to be viewed more easily.
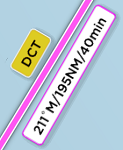
- Segment Information displays the magnetic bearing, distance and flight time (based on planned speeds or the actual speed derived from GPS when in flight) for each stage of the route.
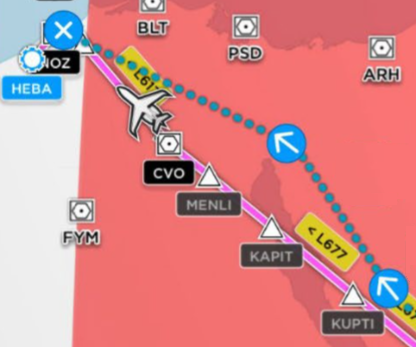
- Route Guidance displays extra information at the bottom of the screen showing the bearing, distance and ETE to the next waypoint along the route from your present location. If you are off-track, you can tap a waypoint and then
 ; the guidance panel then displays both the direct path to that waypoint (indicated by
  ) and the path to the next waypoint along the route (indicated by
  ).
).
Refer to this online article for further details. - Fuel Guidance displays details of the fuel required for each stage of the flight at the start of the stage.It also shows the required fuel for a 'direct to' journey from you current location to any selected point. Refer to this online article for further details.
- NaviGuard: Radio Navigation checks for anomalies in the information reported by your GPS/GNSS system which may indicate interference (such as sudden changes in reported speed, direction, or position). If an anomaly is detected, you can use radio navigation to give an independent check of your location:
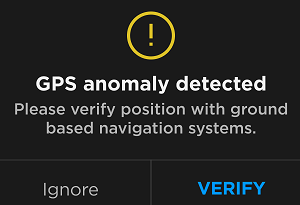
Tap VERIFY to open the position fix sidebar, or tap Input Fix in the bottom right of the screen. (Tap Ignore to halt anomaly alerts for one minute.)
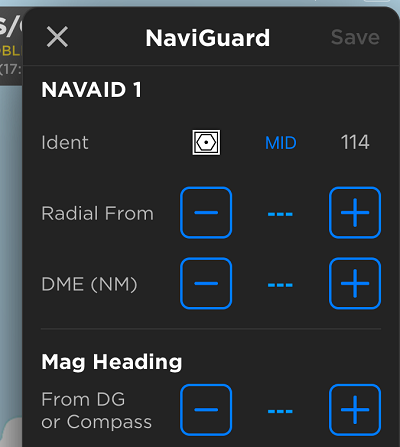
Select a suitable navigation aid by tapping an identifier shown in blue and selecting from the list, or search for an aid by name.
Enter the required information for the fix from your onboard systems. If the selected navigation aid does not have DME (distance measuring equipment) then you will need to enter a second fix.
Tap Save.
The fix is plotted on the map, with an arrow showing the direction of the magnetic heading (or an X if no magnetic heading was entered). Information on the fix is also displayed at the bottom of the map screen. Subsequent fixes are connected by a blue dotted line.
You can view logs of the input fixes and detected anomalies for your flights by tapping GPS Logging in the main menu. You can then choose whether to clear the log or add it to the documents for a specific flight. (We recommend you clear the log after adding it to the relevant flight.)
Note: Download a map of GPS Reported Interference from the map library, which shows areas of reported GPS spoofing and jamming to help you anticipate hazards during flight planning.
Refer to this online guide for further details about NaviGuard.
Measuring Distances
- Using two fingers, press and hold two locations on the screen for several seconds.
The two positions are marked with circles and a pop-up box shows the distance (in nautical miles (NM), kilometres and statutory miles) and bearing between them (in each direction). - Tap and drag either marker to adjust the measurement.
- Tap anywhere on the map to remove the measurement.
Viewing Airspace Information
This option is only available on certain accounts. It allows the various classes and types of airspace to be viewed as a map overlay. Each area is clearly labelled with the name, type and vertical limits of the airspace. The colours used in the overlay are selected in your account settings in the web app.
- Tap a location and select Airspace Info from the sidebar.
All the classes and types of airspace for that location are listed (tap Out of filtered range to view those regions not shown on the map as they are above the selected flight level limit). The airspace labels adjust as you zoom in/out and pan around the map.
Note: You can also view the frequency geometries of communication areas by selecting the option in the sidebar. - Tap an item in the list, and the selected airspace region is highlighted on the map.
You can view essential information about the airspace including the vertical limits and transponder frequencies. For Traffic Management Zones (TMZs), the transponder squawk code is also shown. - Tap the left arrow to return to the Airspace Information list. Tap it again to return to the location pop-up box.
Viewing Geo-Referenced Airport Plates
This option is only available on certain accounts. It allows selected airport plates to be superimposed on to the map so that you can view your route and position in relation to the information on the plate.
When you tap an airfield location and then select Show Plates, the geo-referenced plates available are shown in a sidebar marked with ![]() .
.
- Tap a geo-referenced plate in the list and choose from the options displayed.
As PDF displays the plate in a separate screen which can be annotated, saved or printed.
On Map places the plate on to the map at the correct location and scale. A button is displayed alongside the list of plates; tap this to view a toolbar of buttons for adjusting the settings of the geo-referenced plates.
 - Tap
 and use the slider to adjust the transparency of the plate so that you can also see the map layer and route details.
 - Tap
 to open the plate as a PDF on your device, from where you can annotate, save or print the information.
 - Tap
 to hide or show the list of plates.
 - Tap
 to hide the plate on the map, and tap
  to view it again.
 - To change the geo-referenced plate shown, tap the airfield location again, tap Change Plate and select another plate from the list.
- To close the list of plates and remove all geo-referenced plates from the screen, tap the airfield location and select Hide Plate.
Tip: Once you have reviewed a geo-referenced plate, you can activate the VFR procedures overlay to display the vector tracks for an airfield without the map being obscured by the other information in the plate
