CALCULATING A ROUTE (STEP 1)
The simplest flight plan to prepare is an IFR (instrument flight rules) flight plan. For these flights, you can let the software select a route for you using the Autorouter, which you can then optimise and edit as required before filing. VFR (visual flight rules) routes can be created and edited using the map window.
Note: The Map Toolbar provides many useful tools to help with route planning.
IMPORTANT: When you make any change to the route or fuel settings, a pop-up warning reminds you to either click Autoroute to select a new route OR click Recalculate to update the fuel calculations for the selected route only (the other available routes will be greyed). You only need to click Autoroute if you change route settings.
This pop-up dialog can be disabled by unchecking the Enable warning popup option in Account and Settings > Settings > System.
Note: Click Save at any point to avoid losing your work. This also downloads the flight plan to the iPad app on devices linked to your account.
When you click Save, all sub-menus automatically collapse. Click Route, W&B, Fuel and Crew to return to the route planning menu.
Tips: You can use an existing flight plan to plan a return trip by opening the flight plan and clicking the Reverse Airport Pair button ![]() next to the departure aerodrome box.
next to the departure aerodrome box.
At any point, clicking Briefing will display the current flight log in a separate window, allowing you to check the details without opening a full briefing pack. You can also use this window to view other aspects of the flight plan.
Alerts
When you start to create your flight plan, the map contains an Alerts button ![]() that you can click to view important advisory information. This includes hints and tips on file that affect the calculated route, and any NOTAMs that relate to airport or runway closures. If there are errors in the route and loading/fuel calculations, this icon changes to an amber or red warning symbol
that you can click to view important advisory information. This includes hints and tips on file that affect the calculated route, and any NOTAMs that relate to airport or runway closures. If there are errors in the route and loading/fuel calculations, this icon changes to an amber or red warning symbol ![]() , indicating that these issues must be resolved before the flight can be filed. When all errors have been resolved, a green tick button is briefly shown on the map.
, indicating that these issues must be resolved before the flight can be filed. When all errors have been resolved, a green tick button is briefly shown on the map.
Note: The Alerts pop-up dialog contains a very limited list of NOTAMs that focus on the ability to operate at an airfield or helipad. Refer to the briefing pack for a full list of NOTAMs.
Entering Essential Flight Data
- From the main menu, select Flights and then New Flight.
- Select an aircraft that you have previously configured.
The default settings for that aircraft will be used in the flight planning. Aircraft that have runway analysis enabled are indicated by in the drop-down list of available aircraft.
 - Optionally, enter a flight number in the ICAO format (used by air traffic control to identify flights instead of the aircraft registration).
This number must begin with a letter and contain no more than 7 alphanumeric characters. It must not contain any hyphens or other symbols. - Enter departure and destination aerodromes (ADEP and ADES).
A long name or IATA code is converted into the equivalent ICAO code. If a location is unrecognised then the coordinates and full name must be entered in Field 18. - Enter the date of flight (DOF) and estimated off-block time (EOBT).
We recommend that you file flight plans at least 2 hours in advance of the EOBT. You can file up to 120 hours (5 days) in advance in the EU, 27 days in advance for internal flights in the USA, or 24 hours in advance for international flights to or from the USA (we recommend that you file plans no earlier than 21 hours before departure time in the USA to avoid errors in the date allocation). - Select the type of flight from the options in the drop-down list.
- Optionally, add a destination alternate.
If you have preferred alternates already set in the default flight data, then click one of these from the Preferred list, or enter a new alternate. - Select the Flight Rules (IFR, VFR, Yankee or Zulu).
If the departure or destination aerodromes cannot support IFR, then the flight rules are altered automatically to Y or Z. - The enroute time for the flight in still air is estimated by the software, but you can enter a value manually if preferred (the label changes to Manual EET).
Be aware that this will affect the fuel calculations. - Enter the Target Level (flight level in hundreds of feet) and Cruise Profile (if your aircraft is configured with advanced performance data).
- Enter values for the Initial Airspeed (in knots) and Initial Level (flight level in hundreds of feet) if the default values are not appropriate.
These are the altitude and speed at the top of the climb after take-off. Ensure that the flight level you enter is above the altitudes of the departure and destination aerodromes (ADEP and ADES). - Finally, you can enter an optional Label for your flight.
This can be used as a search item to find the flight plan from the All Flights screen.
Using the Autorouter
- For IFR flights, enter the Target Speed (in knots) and Target FL (flight level in hundreds of feet) that you want the Autorouter to use when calculating the flight route.
The target airspeed is inserted automatically from the advanced performance data for the aircraft (if available). The target values are different from the initial values of airspeed and flight level set previously, which only apply to the first cruise segment of the flight. Refer to this online article for further information. - Click AutoRoute to calculate the route.
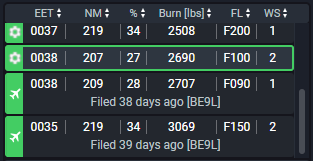
A progress icon shows that the Autorouter is finding routes. Once several routes are identified, a table is displayed which lists characteristics of each route: flight time, distance (both nautical miles and the extra distance travelled with respect to the great circle distance, expressed in %), fuel burn, flight level and wind shear. (Note that wind shear is expressed as a vector calculation on a scale of 1-30, not the more usual scalar value. Refer to this online article for more information.)

Flights marked with the icon have been filed in the past 180 days by another operator using that route (additional details are supplied in the table). These routes are therefore more likely to be accepted by the relevant authorities during filing. Routes marked with the icon
 are valid routes that have been filed before, while routes marked with the icon
 are freshly generated. Company preferred routes are marked with the icon
 and should be selected following your company's policy. In certain regions, routes preferred by air traffic control may also be included, marked with the icon
 . These may have additional instructions which you can view by clicking the Remarks link in the table. Note: Routes that include North Atlantic Tracks have NAT shown above the route icon.
By default, routes are listed in ascending order of fuel burn. You can sort the table for a specific characteristic by clicking on the column heading, and then double-clicking a row to select the route which best meets your requirements. For example, choose the lowest wind shear for the most comfortable flight or the lowest EET for the shortest flight.
Routes with green icons are valid and can be filed. Routes with red icons have one or more routing issues that require resolving before the plan can be filed; see the Route alerts for more information.
Once the table is displayed, you can immediately begin inspecting these routes using the map by clicking on each row in the table, even while the Autorouter is still identifying further routes. Once you are happy with the selected route you can click Cancel to discontinue route-finding, or you can wait for the full autorouting to be completed.
Refer to this online article for more information on the Autorouter results table. - If you find that the routes generated do not meet your requirements, click Autoroute Settings to configure the automatic route calculation for this flight.
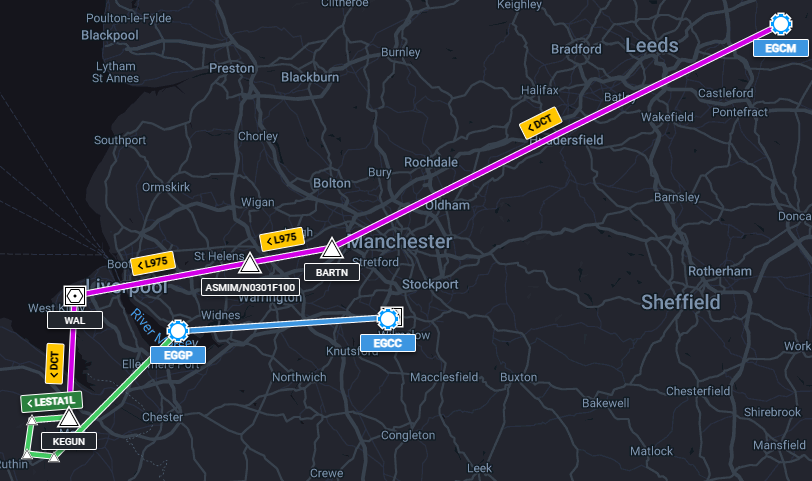
A draft route is calculated and displayed on the map as a pink line with the waypoints and airways labelled. Where a SID or STAR has been included in the route, the line is shown in green. If you have selected alternates, these routes are shown as blue lines with only the destinations labelled. If Additional Alternates are enabled on your account, these routes are shown using dashed blue lines.
Refer to this online article for further information on the displaying of routes to alternates.

The shortened route string (which can be edited manually) is added to the box in the menu. The full list of waypoints is given in the briefing pack which can be downloaded using the flight review options in the flight plan screen. - Click on the waypoints to display details of their location in a dialog.
Where the waypoint identifier is underlined, click the identifier to view an aerial image of the view at that location for reference in flight.
Click X to close the dialog. - If required, you can edit your route using the shortened route string shown in the route box. Click
 to view the effects of your editing.
 - If you have made changes to a route, click Validate to check that the flight plan can be filed.
You cannot file invalid flight plans. VFR flights do not require validation.
In most cases, a flight plan will be validated automatically when it is calculated. A tick indicates that the flight is accepted and can be filed. Otherwise, a description of problems with the route is given in the alerts, with the option of either editing the route or saving it in its current form.
Note: When a flight along EuroControl routes is validated, a warning icon will appear in the map if there is an invalid route segment. Click the icon to display a window on the map giving full details of the issues. Adjust the route as needed without closing this window and repeat the validation until the issues are resolved. Refer to this online article for more information.
- Once a route is selected, you can copy the details to the clipboard on your device by clicking Flight Plan.
- Instead of filing the flight plan through your software supplier, this copied file can be used to send the flight plan to the air traffic authorities by a different route if preferred.
Flight Level Optimization
-
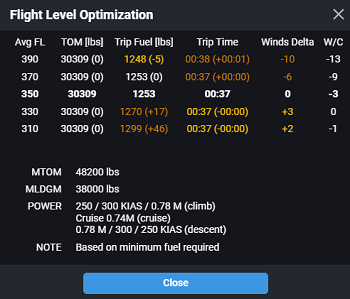
Optionally, click Optimize for IFR flights (in the web app only).
The flight is analysed and alternative flight levels are suggested to save fuel or time based on available weather data, including the wind component (W/C) where a positive value is a headwind and a negative value is a tailwind. Click More on the initial Optimize screen to view all the calculation data.
IMPORTANT: Optimization only applies to the initial flight level. If the flight level changes at any point, the remainder of the flight plan will not be optimised.
Click Close and, if preferred, adjust the flight level and then run AutoRoute and Optimize again.
Adjusting Flight Settings
- Click SID/STAR - Alternates to display a series of optional refinements to the route selected by the Autorouter.
- Click Performance Profile to display the power settings for the main stages of the flight, including the cruise to the take-off alternate.
This menu is only available for flights using aircraft configured with advanced performance data. - If required, change the power setting selections from the drop-down lists to create a performance profile for this specific flight.
The Cruise setting is read-only and must be changed at the top of the flight planning menu. The default options are taken from the Fuel & Performance section of the aircraft's configuration. - Click Fuel and W&B to adjust the aircraft's weight and balance calculation, and compute the fuel requirements for the flight.
If desired, enter the required information for reclearing and contingency planning (if this option is available on your account). - Depending on the type of aircraft used, select EDTO or SEOPS and configure the flight settings for these planning options.
- To add Additional WX (weather) and NOTAM information to the briefing pack, enter suitable aerodrome locations along the flight route.
This option only appears if it is enabled in Account and Settings > Briefing Pack. - Enter the crew members from the personnel previously entered (see Managing Crew and Passengers).
These crew members will be sent the briefing pack and other flight information (if they are registered on the account). You can add new crew users if you are the account administrator (master user). - Enter required additional remarks for Field 18 of the flight plan.
- Click Field 19 - Search & Rescue [SAR] and check that the calculated Endurance for your aircraft is longer than the Estimated Enroute Time (EET) for the flight.
If this is not the case then the flight plan will contain an error and cannot be filed. You will need to manually select a different endurance profile in the aircraft's Fuel and Performance settings (if this option is available), choose a shorter route and/or adjust the quantity of fuel on board and click Recalculate. - Check that the Search and Rescue equipment previously set up for your aircraft has been imported into Field 19 of the flight plan.
If necessary, make changes to the items on board using the boxes. - Enter any additional filing addresses for your flight plan that are not included in the list of addresses in your account's default flight data settings.
- Use Plan Options to enter flight plans for aircraft formations.
See this online tutorial for further details. - Click Next.
The Services menu is displayed. Advisory messages may also be displayed with important information on your flight plan.
You can return to Step 1 by clicking Back in the Services menu.
Return to Flight Planning with the Web App
